Table of Contents
Table of Contents
- Introducing your landscaping site analysis checklist template
- What is a landscaping site analysis checklist?
- Why does your landscaping company need a site analysis checklist?
- What are the key elements of a landscaping site analysis?
- How can you conduct a comprehensive landscaping site analysis?
- What are some tips for an effective landscaping site analysis?
- What are some common mistakes to avoid during site analysis?
- Beyond templates: How Aspire’s software complements your site analysis process
- Back to you
A site analysis is the foundation of any landscaping project. From topography to client preferences, every detail counts. However, landscaping pros often miss site details, plan inefficiently, and make costly mistakes during execution.
The free Landscaping Site Analysis Checklist Template helps you tackle those challenges. This easy-to-use tool will ensure you don’t miss anything before you dig.
Introducing your landscaping site analysis checklist template
A landscaping site analysis checklist helps operational managers plan and execute landscaping work effectively. This template covers all the critical factors to ensure a successful project, from terrain evaluation to compliance with local ordinances.
Here’s what’s on the checklist:
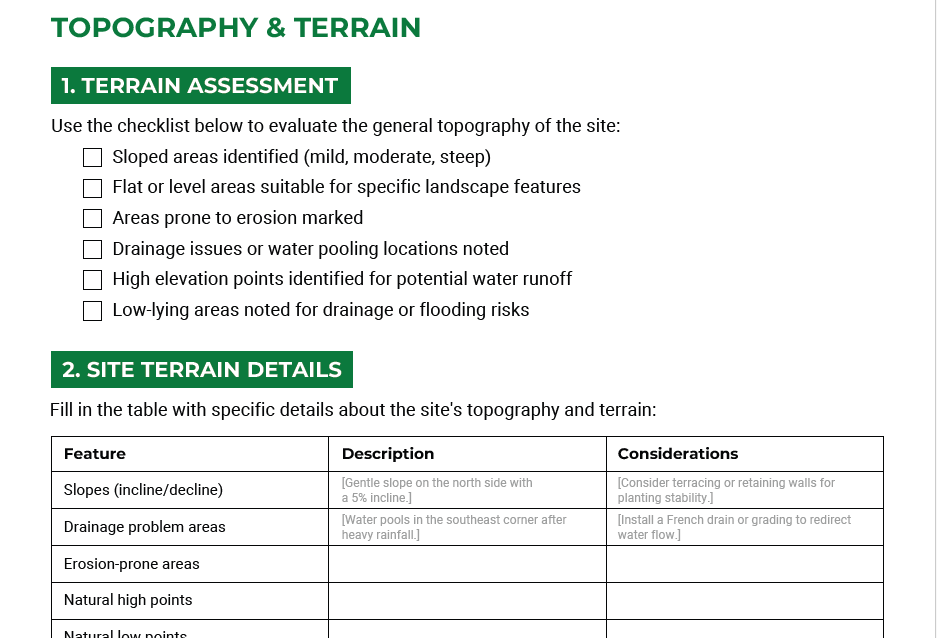
Topography and terrain notes, such as slopes, drainage issues, and erosion risks on the property
Soil data, including pH, fertility, and drainage.
Utilities and infrastructure present, i.e., underground utilities, overhead lines, and existing irrigation systems.
Client preferences may include design styles, privacy requirements, and budget constraints.
Zoning and regulatory compliance include easements, setbacks, and local ordinances.
Accessibility and traffic flow, including vehicle access, walkways, and ADA compliance.
Each section is designed to help landscaping pros simplify the site analysis process, avoid mistakes, and reduce oversights.
Customize the template to your business needs, whether for big commercial projects or custom residential designs.
With this template, every detail is accounted for, setting your landscaping work up for success.
What is a landscaping site analysis checklist?
A landscaping site analysis checklist helps operational managers and crew leaders to assess and record a site's critical elements before a project starts. It ensures every part of the landscape, from soil type to existing trees, is considered.
This systemized checklist simplifies the site analysis process, so nothing is missed that could create inefficiencies or mistakes once the contract starts. It also sets the foundation for a good design.
A thorough site analysis simplifies the planning stage so landscapers can make informed decisions.
Key components of a landscaping site analysis checklist:
Site inventory: Existing plant material, wetlands, and hardscape elements like driveways and walkways.
Soil and irrigation: Soil conditions, irrigation systems, and erosion control are essential for long-term success. Healthy soil rich in nutrients and balanced pH is crucial for plant growth. Adding organic matter can improve soil quality by increasing water retention, nutrient availability, and soil structure.
Climate and microclimate: Wind directions, sunlight exposure, and hardiness zones to select plant material.
Property boundaries and easements: Property lines, easements, and zoning to avoid legal or design conflicts.
Utilities and drainage: Plan around underground utilities and gutters to ensure safe landscaping.
Why does your landscaping company need a site analysis checklist?
A systemized site analysis checklist is essential for any landscaper to get better results. It covers critical aspects of the property, saves time, and reduces the chance of mistakes.
1. Ensures accuracy
A site analysis checklist covers elements from soil type to elevations in all landscaped areas. Understanding the benefits of healthy soil is key to plant growth, as it improves physical and chemical properties like pH and organic matter.
Without a systemized approach, it is easy to miss important aspects like property lines or underground utilities, which can cause design problems. A checklist empowers informed decisions and creates accurate designs considering all site conditions.
2. Saves time
A landscaping site analysis checklist simplifies the process instead of relying on memory or manual processes. This systemized approach allows professionals to quickly gather data on microclimates, hardscapes, and plant material, so they can quickly move from analysis to design and get the project done faster.
3. Reduces errors
Reduce the likelihood of missing essential parts like erosion control or wind direction impacting plant selection. Missing these can cause rework, destroy profitability, and cause clients to be unhappy.
Using a site analysis checklist in your business will produce more accurate results, be more efficient, reduce the chance of mistakes, and improve outcomes.
What are the key elements of a landscaping site analysis?
A site analysis covers property features landscapers must consider before a project. These elements guide the design and create a functional, sustainable, beautiful landscape.
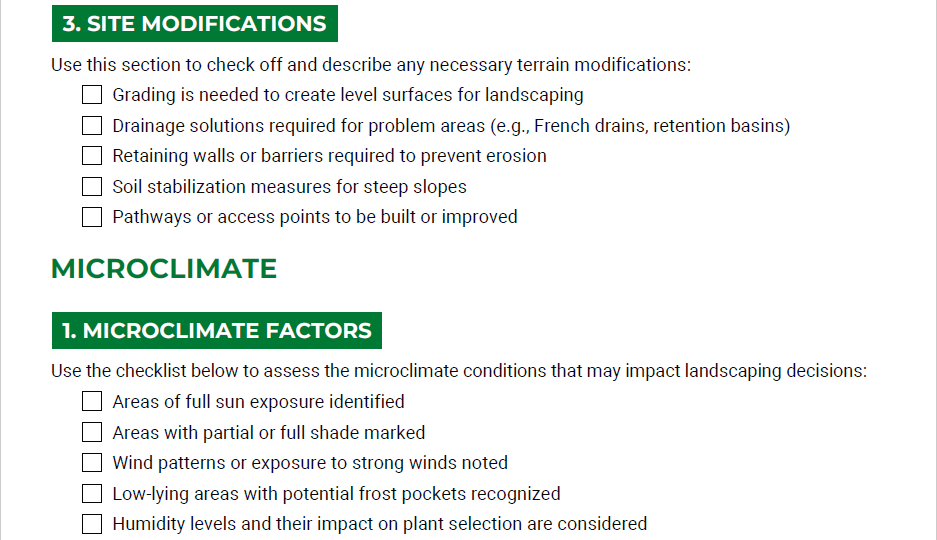
Topography and terrain: Elevations and natural slopes to design for drainage and functionality.
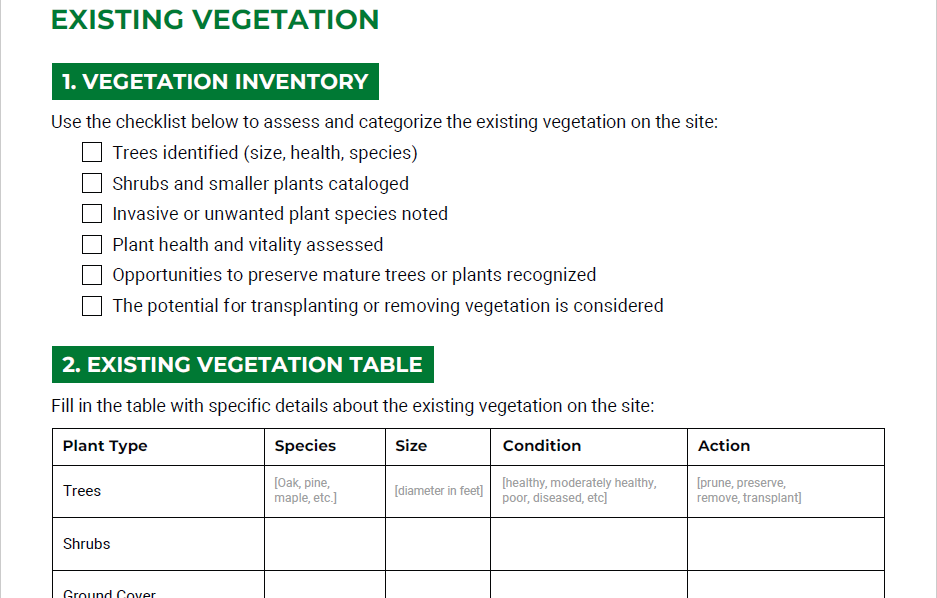
Existing vegetation: Trees and plant material to keep or replace as part of the new design.
Climate and weather: Wind directions, sunlight exposure, and microclimates to select plants and materials.
Soil quality and composition: Soil conditions for plants and drainage.
Utilities and infrastructure: Underground utilities and irrigation systems to avoid conflicts during construction.
Water sources: Availability of irrigation and erosion control measures.
Accessibility and traffic flow: Driveways, walkways, and paths to support access and traffic flow.
Client preferences and requirements: Homeowner’s preferences in the overall design.
Zoning and regulatory: Zoning laws and ordinances comply with local regulations.
By covering all these elements, landscapers can design for function and compliance and set themselves up for success.
How can you conduct a comprehensive landscaping site analysis?
A good site analysis is key to understanding the property and getting a successful outcome. A systemized approach ensures crucial data, from soil conditions to zoning regulations, is noticed and recorded.
Here’s a step-by-step guide to an entire site analysis without missing anything.
Step 1. Initial site walkthrough
Start by walking around the property and noting the key elements of topography, existing trees, and hardscapes—record soil texture, photograph walkways, driveways, and any structures that may impact the project.
This first walk will identify the obvious factors, such as drainage issues or soil type, that will influence the design. Make a list of areas to investigate further in the next step.
Step 2. Gather detailed data using the checklist
Next, use the site analysis checklist to gather all the data on the property, including microclimates, property lines, and underground utilities.
Be thorough in each section, as even the small details can impact the overall design. Understanding wind directions and hardiness zones will guide your plant and ground cover selection.
When assessing soil conditions, identify if you have alkaline soil, which has a pH over 7.5 and can affect plant nutrient availability. Also, consider the impact of tiny clay particles, which can dominate soil structure due to their large surface area to volume ratio.
Step 3. Review and discuss findings
Once you have gathered all the data, review it with your team or client. Analyze potential challenges, such as poor soil conditions or conflicting zoning regulations.
Wet and clay soils can be challenging due to drainage and structural issues, but are also nutrient-rich. Addressing these issues may mean improving soil structure and managing water infiltration.
This is the time to consider design solutions like erosion control or irrigation systems. Review the data thoroughly to ensure that your design addresses all site conditions.
Step 4. Integrate findings into your project plan
Finally, all the information should be incorporated into the overall landscape design.
Ensure the plan reflects the site’s conditions, from elevations to existing vegetation. Don’t forget to tailor each part of the project to the site’s specific conditions and the client’s needs and regulations.
By following this site analysis process, landscaping professionals can create better designs that are less prone to change orders and rework.
What are some tips for an effective landscaping site analysis?
A good site analysis requires attention to detail, the right tools, and client collaboration. These will help you not miss anything and get better project outcomes. Follow these steps to avoid costly mistakes and create a better design.
Use the right tools
Bring measuring tapes, cameras, and soil testing kits to get accurate data on site conditions. A reliable site analysis checklist will ensure you cover all the bases.
Involve the client
Discuss the client’s preferences and needs for hardscape, plant material, and walkways. Their input is key to aligning the design with their vision.
Be thorough
Pay attention to soil type, existing trees, and wind directions. Thoroughness will prevent you from overlooking elements that will later impact the design.
Sandy soils
Identify sandy soils that are light, low in nutrients, and can drain quickly. Such soils can suffer from water erosion. Add organic matter and fertilizers to improve their nutrient and water retention. Choose plants that thrive in the soil present on the property to improve client satisfaction and minimize the need for rework after the contract ends.
Stay up to date with local regulations
Check local zoning regulations and property lines. Being informed will prevent legal issues and costly re-designs.
What are some common mistakes to avoid during site analysis?
Overlooking details can lead to costly errors, design flaws, and unhappy clients. By avoiding these common mistakes, landscape professionals can improve their site analysis and achieve better project outcomes.
Ignoring soil quality: Not testing soil conditions can lead to poor plant growth and drainage issues. Always test the soil type to determine its suitability for your plant selection and design.
Overlooking drainage issues: Not examining water flow patterns can result in erosion and waterlogged areas. Erosion control and irrigation system planning are key to long-term success.
Not considering sun and shade patterns: Not accounting for wind directions, sun exposure, and shade can lead to wrong plant and material choices. Analyze microclimate conditions to choose the right location for plants.
Not involving the client early on: Not discussing with the client early on can lead to unmet expectations. Incorporate their preferences in the landscape plan from the start to ensure satisfaction.
By avoiding these mistakes, landscaping professionals can improve the quality and efficiency of their site analyses and achieve better project outcomes.
Beyond templates: How Aspire’s software complements your site analysis process
While a site analysis checklist template is a great tool, Aspire’s software takes it to the next level. Aspire integrates site analysis with project management so landscaping professionals can work more accurately.
From data organization to team collaboration, Aspire’s platform has features that support every stage of your landscaping projects.
Organize and Store Data Efficiently
Aspire allows you to store all your site analysis details, such as soil conditions, site inventory, and property lines, in one place.
This information lets you quickly reference key data points during the design process and avoid using scattered documents.
Integrate Aspire with PropertyIntel to activate the power of AI in property measurements, takeoffs, and site analysis without the time-consuming hassle of site visits and walkthroughs.
Collaborate with Team Members
Aspire’s platform allows your team to share insights, upload photos, and document site conditions such as existing trees or hardscapes.
This collaboration feature ensures everyone is on the same page and reduces communication gaps that can lead to errors during landscaping work.
Seamless Project Management
Once the site analysis is complete, Aspire’s project management tools continue to support your team through the next phase.
With real-time updates via the Aspire Mobile app, your team can access site plans, schedules, and client preferences right from the field. This guarantees smooth operations from site analysis to project completion and allows you to deliver projects on time.
Aspire’s software allows you to streamline your entire landscape design process from start to finish, resulting in better efficiency and client satisfaction.
Back to you
A site analysis will ensure a successful landscape site project.
Use the free site analysis checklist to organize your process, avoid costly mistakes, and grow your business. For even better results, try Aspire’s software.
Download the checklist template today and book a free demo to see how Aspire can transform your business processes.