Table of Contents
At Aspire, we strive to help our clients run their business more efficiently and ultimately achieve greater success. That’s why we’re always working to provide you with the tools to help you manage your business—and your relationships—more effectively.
Our latest release includes a number of improvements aimed at helping you seamlessly manage your field operations, keep your back office running smoothly, and maintain a clean customer database, such as:
Scheduling & route management enhancements
Bulk move work tickets on the schedule board
Manage multiple routes at once with bulk actions
Control new work ticket creation in Crew Mobile
Event logging, change order, and invoicing updates
Improved weather event logging and reporting
Allow change orders on as-needed services without work tickets
Invoice by service or occurrence on per-service invoice types
Cap fixed-price contracts by date or occurrence and convert to T&M
Invoice by service or occurrence on per-service invoice types
CRM record management capabilities
Delete contacts
Duplicate property warning
Attachment preview and attach to proposal
{% video_player "embed_player" overrideable=False, type='hsvideo2', hide_playlist=True, viral_sharing=False, embed_button=False, autoplay=False, hidden_controls=False, loop=False, muted=False, full_width=False, width='1920', height='1080', player_id='86333245851', style='' %}
Seamlessly manage your field operations with enhancements to scheduling and route management.
When you’re busy—whether during snow season or green—having the ability to make quick adjustments to your schedule and routes at any time helps keep your operations running smoothly. To help you achieve even greater levels of efficiency, we’ve made several scheduling and route enhancements in this release:
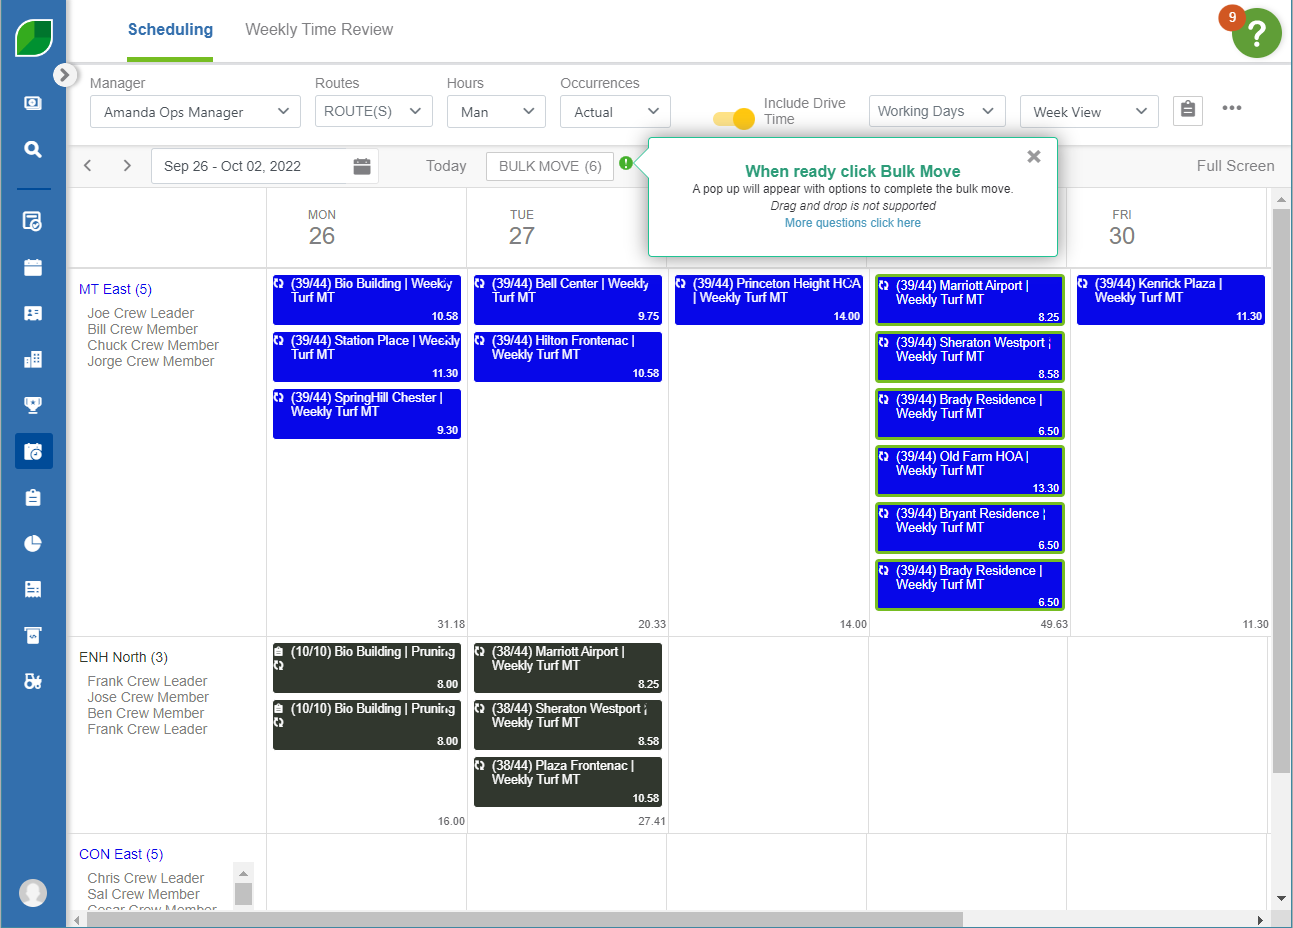
Bulk move work tickets on the schedule board
With this release, you can now move multiple work tickets on your schedule at the same time. To start, simply press and hold the Control button on your keyboard while clicking to select the applicable work tickets on the schedule. The order in which you select the tickets is the order in which they will appear on the schedule once moved.
As you begin selecting tickets, a ‘Bulk Move’ button will appear at the top of the schedule, displaying the total number of work tickets selected. A green highlight will also appear around the tickets you’ve clicked. To select work tickets across multiple weeks, first release the Control button, use the arrow buttons at the top of the schedule to advance to future weeks, and then press and hold ‘Control’ once again while clicking to select the desired tickets.
When you’re done making your selection, simply click the ‘Bulk Move’ button, specify the new route and target date, and click ‘Save’. When the page refreshes, the reassigned work tickets will appear on the selected date and route in the order of selection.
You can also move work tickets to a new date from the monthly view of the schedule. After making and saving your selection, the tickets will appear on the new date in the order they were selected, assigned to their original routes.
Manage multiple routes at once with bulk actions
Now you can manage routes more efficiently with the ability to activate or deactivate multiple routes on your schedule at once versus individually. Users with ‘View Routes’ permissions can navigate to ‘Manage Routes’ via the drop-down menu in the upper right of the schedule board.
To begin, simply select the desired routes, navigate to ‘Bulk Actions,’ and choose to either activate or deactivate them from the drop-down menu. Only routes appearing on the same screen can be selected simultaneously; switching screens will automatically deselect any routes you’ve chosen. Once deactivated, affected routes will no longer appear on your schedule board.
Control new work ticket creation in Crew Mobile
You can now choose to show or hide the ‘Create New Work Ticket’ button within Crew Mobile. From the Route Details page, you can easily control the visibility of this button by checking the ‘Show new ticket button in Crew Mobile’ box in the upper right of the screen.
This capability provides you with greater control and flexibility over who can create new tickets within the app; for example, you may want to hide this button for subcontractor routes while leaving it visible for routes composed of your company’s employees.
Keep your back office running smoothly with event logging, change order, and invoicing updates.
Operational efficiency is just as important in the office as in the field. In this release, we’ve also included a number of enhancements designed to support your back-office operations:
Improved weather event logging and reporting
When weather strikes—snow, tropical storm, or otherwise—it’s not always easy to understand your performance related to the event. With this release, we’ve enhanced event logging and reporting in Aspire. With more than 20 new work ticket search fields added to the current ‘Weather Events Report,’ you can now access event-related financial data like never before.
To utilize this report effectively, first create a new event in the Event Log and enter the desired location name. After assigning the branch, carefully select the start and end dates/times with as much accuracy as possible. Based on the designated branch and time range, the zip codes of any properties with work tickets to which time and materials were allocated within the specified time range will automatically populate the Zip Code field.
In addition to grouping and sorting work tickets by event, based on the property zip codes designated in the event log, you can also utilize any of the available work ticket advanced search fields to report on specific performance insights related to an event.
Allow change orders on as-needed services without work tickets
To help you work as efficiently as possible, we’ve streamlined the process for making changes to as-needed services without a work ticket. Now you can easily make the necessary changes without having to create a new work ticket (and delete it later) when none exists for an opportunity.
From the Opportunity Details screen, now you can simply select ‘Change’ from the hamburger menu (⋯) and update the date to reflect the start date of the change. Navigate to the estimate, open the kebab menu (⋮) for the relevant as-needed service, and select ‘Change’ to initiate the change order. Each change will generate a new line item on the estimate, denoted by a version number to the left of the ‘Add’ icon.
Cap fixed-price contracts by date or occurrence and convert to T&M
In this release, we’ve added the ability to set a date or an occurrence limit on fixed-price contracts containing multiple service visits. You can also configure your estimates to allow the addition of as-needed T&M services once the capped, fixed-price service occurrences are completed or the related contract expires.
With this improved flexibility, you can now easily add additional work tickets beyond the scope of the original contract at the T&M rate to your schedule board. However, you can only utilize this feature for services under a fixed-price contract.
Invoice by service or occurrence on per-service invoice types
With this release, you can now generate invoices for an individual service with a per-service invoice type. This capability allows you to create separate invoices for individual occurrences associated with a service within the Invoicing Assistant, as well as initiating advanced searches using the per-service field.
Now if multiple services are ready for invoicing, you’ll see individual line items for each service in the Invoicing Assistant. This visibility enables you to easily identify and separate the services for which you want to bill; for example, when multiple tickets are open due to multiple, closely occurring snow events, but you only want to generate an invoice for one specific event.
On the invoice, each per-service occurrence will be listed as a separate line item along with the related work ticket information, so your customers can see and understand what they’re being billed for.
Estimate item name carry over to invoice
To ensure consistency between estimate and invoice, you can now opt to use the item display name from an opportunity on the invoice instead of the service item description. In the instance an item’s name is changed on the estimate, the invoice will now reflect the revised name, so everything listed on the invoice will match what your customer saw on the estimate.
To configure the system to display the opportunity’s display name instead of the service item description, select ‘Configuration > Invoicing’ in the Admin menu and check the box, ‘Use Opportunity Item Display Name.’
Maintain a clean customer database with our latest CRM record management capabilities.
Keeping your data free of duplicates is key to communicating effectively with your customers and prospects, as is the ability to seamlessly share files. To help you do so, we've included several CRM improvements in this release:
Delete contact
In this release, we’ve added a role-based permission (‘Delete Contacts’) to allow the permanent deletion of contact records within Aspire, one of the top-voted items in the idea portal. Once enabled, this permission will allow you to delete “clean” contacts from the system, meaning contacts with no assigned history or association with another record; for example, if a contact is assigned a pay rate or associated with a property, it can no longer be deleted.
Please note, once a contact is deleted it cannot be undone. To review all contact record activity, including creation, edits, and deletions, you can access timestamps and details in the ‘Audit Contact History Report.’ As an added bonus, this capability lays the foundation for the ability to merge duplicate contact records—coming in a future release.
Duplicate property warnings
Property names frequently change, which can lead to the creation of duplicate records. To help you avoid this issue, we’ve harnessed Aspire’s geolocation capabilities to compare addresses, detect duplicates, and alert you of the potential duplication.
If the address you’ve entered is already listed under an existing property in the system, you'll receive a warning message. You can then review a list of all properties containing the same address within the pop-up message window and opt to ‘Cancel’ the action or ‘Create’ the new property. You can also quickly navigate to the existing property by clicking on its name.
Attachment preview and attach to proposal
In this release, we’ve added new attachment functionality. Now you can see a preview of the item before attaching it to a record and choose to attach or download the item from the preview window.
You can also indicate which attachments you’d like to include with proposals or upload new attachments when generating a proposal email. To preview attachments from the search list, simply select the attachments you’d like to preview and then select ‘Preview’ from the Bulk Actions drop-down menu.
----
We hope you find these new updates help streamline workflows for a more seamless user experience while enabling greater efficiency from the office to the field.